Table of Contents
Dental training guide

This information has been copied from the document “dental training guide in progress”
Dental clinic address and hours of operation
Grand Forks Dental Clinic:
212 South 4th Street, Suite 101
Grand Forks ND, 58201
Phone number: (701) 757-2100
Fax number: (701) 757-2103
Hours of operation:
| Day | Open | Close |
|---|---|---|
| Monday | 7:30 AM | 5:00 PM |
| Tuesday | 7:30 AM | 5:00 PM |
| Wednesday | 7:30 AM | 5:00 PM |
| Thursday | 7:30 AM | 5:00 PM |
| Friday | 7:30 AM | 5:00 PM |
As of right now, we are currently not accepting NEW adult (18+) patients due to our limited providers. We ask that, if patients are not already established, to call Monday through Friday at 7:30am for our same-day appointment if they are experiencing bleeding, swelling, cracked/broken tooth, etc. We do not guarantee that we are able to get patients in for a same-day appointment but encourage them to try everyday until we can. An established patient is someone who has been seen in our clinic for routine (Non-emergent) care in the last three years.
Provider capability and availability
Dentist information:
| Name | Procedures | Ages seen | Insurance accepted |
|---|---|---|---|
| Dr. Grewal | All procedures | All ages | All insurance, including out-of-state |
| Dr. Sandry | All except root canals (RCT) | All ages | All insurance, including out-of-state |
Dental support staff:
| Name | Role | Availability | Ages seen | Notes |
|---|---|---|---|---|
| Cindell Haugen | Dental Hygienist | Full-time | Any age | |
| Debra Kolden | Dental Hygienist | Flex | Any age | |
| Carmen Beauclair | Dental Assistant | Unspecified | 5 - 14 years | Adult cleanings: 1 hour only |
| Kari | Unspecified | Flex | Any age | |
| Nicole | Unspecified | Flex - Fridays only | Any age | |
| Haley | Unspecified | Flex - Fridays only | Any age |
Procedure types and appointment lengths
Dental procedures overview:
| Procedure | Length | Description |
|---|---|---|
| Comp/Pano/Bitewings | 30 minutes | Exam and X-rays to establish as a patient (ADULTS) |
| Extractions (Short/Long) | 30 / 60 minutes | Removal of tooth |
| Fillings (Short/Long) | 30 / 60 minutes | Restoring tooth damaged by decay |
| Full Debridement | 60 minutes | Removal of thick deposits on teeth |
| Limited Exam | 30 minutes | Focused exam for a specific concern |
| Partial Impression | 60 minutes | Impressions for partial denture (pre-paid appointment) |
| Periodic Prophy | 30 / 60 minutes | Cleaning and exam. See age-based scheduling notes below. |
| Pulpal Debridement | 90 minutes | Removing decay to prepare for root canal |
| Root Canal (Short/Long) | 60 / 90 minutes | Removing diseased tissue from tooth roots (pre-paid appointment) |
| Scaling/Planing (Short) | 60 minutes | Deep cleaning below the gum line |
| Scaling/Planing (Long) | 90 minutes | Deep cleaning below the gum line |
| Sealants | 30 minutes | Preventive treatment to avoid cavities |
| SDF | 30 minutes | Prevents decay in baby teeth (same time as Filling Short) |
| Crown Prep | 90 minutes | Crown preparation (pre-paid appointment) |
| Child Prophy | 30 minutes | For patients 11 years and under |
| Adult Prophy | 60 minutes | For patients 5 years and older |
Dental clinic checklists

Start of day checklist:
| Task | Notes |
|---|---|
| Turn on lights, log into Phone, Epic, and Dentrix | |
| Log into computer/phone | Turn on scanner |
| Log into Dentrix, Epic, and Teams | |
| Tend to provider requests | For example: Rescheduling pts if a provider happen to be out |
| Check voicemails, return patient calls | |
| Chart prep as soon as time allows | |
| Start confirmation calls | Typically done by noon |
 Reminder: Check voicemails through out the day as time allows – Return patient calls as needed.
Remember your 1st priority is assisting our patients, present in our clinic.
Afternoon checklist:
| Task | Notes |
|---|---|
| Review insurances from the morning | |
| Check voicemails | |
| Ensure all morning paperwork is scanned into Epic and Dentrix | |
| Review insurances for the following day |
Closing checklist
| Task | Notes |
|---|---|
| Close cash drawer | |
| Check voicemails | |
| Wipe down lobby chairs, tables, workstations, door handles, and front desk | |
| Verify all paperwork for the day is scanned into Epic and Dentrix | |
| Review insurances from the afternoon | |
| Shut lights off |
Weekly checklist
| Task | Notes |
|---|---|
| Dental work-queue |
Dental clinic information
The providers in the back only use Dentrix to know their schedules and their patients’ information. To log into Dentrix, you will use the following sequence.
- Search for and open Office Manager. Its' icon is a brown chair.
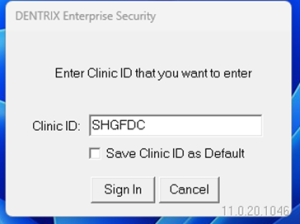
- Enter the Clinic ID of SHGFDC and click Sign In
- Once logged in, select the icon of the red book to open the schedule viewer (it resembles the Snapboard within Epic).

- You can tab from page to page using the F1 and F2 buttons on your keyboard. Most of our providers are on the F1 tab.
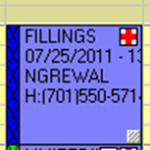
- On the left side of the patient’s appointment block, there is a colored bar. This bar is updated from EPIC in many cases but in a few you will need to update them yourself.


| Color | Meaning |
|---|---|
| White | No update to the appointment at this time |
| Yellow | Appointment confirmed (called the day before) |
| Light Blue | Left a message when calling to confirm the appointment |
| Green | Patient has signed in for their appointment |
| Red | Patient has been checked in |
| Pink | Patient is getting vitals taken (has not seen the dentist yet) |
| Dark Blue | Patient is with the dentist and undergoing treatment |
| Purple | Patient cancelled or left without being seen |
| Brown/Green | Patient no-showed their appointment |
If an appointment is greyed out like this, the appointment has been completed, and the patient is likely not in the clinic any longer.

Scheduling in Dentrix
Epic and Dentrix Integration Overview
- Dentrix is used by dentists for charting and viewing their schedule.
- Epic is the primary system for scheduling. Information entered in Epic is automatically transferred to Dentrix.
What Syncs Automatically
- Appointments scheduled in Epic → appear in Dentrix
- Provider changes made in Epic → reflected in Dentrix after refresh
What Does NOT Sync
- Changes made in Dentrix do not transfer to Epic
- Notes added in Epic do not appear in Dentrix
❗ Important:
- Always make permanent changes in Epic to ensure both systems stay aligned.
Adding Notes for Providers
- Add important notes in Epic before completing scheduling
- If missed, you must manually add them in Dentrix
Changing Appointment Provider in Epic
- Right-click the appointment in Epic
- Select Change
- Make necessary updates
- Dentrix will reflect changes after a refresh
Handling Same-Day Cancellations
This is the only time to edit appointment status in Dentrix directly
- Cancel the appointment in Dentrix using the color codes (as discussed earlier)
- Update the EOD status to “Same Day Cancel”
- Add the reason in the appointment notes
This ensures providers are informed and Epic tracks the cancellation properly.
Scanning into Dentrix
There are only a few documents that we give to patients that get scanned into Dentrix.
To start, this is the symbol you will looking for on a patient’s information page to scan into their charts.

This is also where you would go to see if a patient needs the following pieces of paperwork:
- Health History
- Needed annually so that the providers in the back can keep up to date on any possible complications.
- Other documents that can be found in Dentrix are:
- triage
- oral surgery consent
- treatment plans
- referrals
- med clearance
- prior auths
Finding a patient and their chart
When looking for a patient’s chart in Dentrix, you will want to select this icon on the top of the Dentrix schedule. You can search for patients the same way you can in Epic as the information in Epic is transferred over. Chart number is the easiest way to do so, that would be the patient’s MRN.


The tooth icon in the patient’s profile will be how you open the patient’s chart and where you can find the notes for that patient. In these notes, you will find what the patient needs for their next appointment, If they have been seen in the past. You will want to use this to know what a patient needs and not just the word of the patient. It is also where you can find any updates about a prior authorization that may be in or other notes of import.

Reading a chart
- Red on the teeth – treatment that has been planned and needs to be done.

- Blue on teeth – Work that has been completed here.
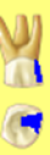
- Green on teeth – Work that has been completed elsewhere.

- Outline of the top of a tooth – a crown color coded

- Outline of the top of a tooth without a root – Partial denture tooth color coded


When reading the chart, the teeth will be listed along the outside of the chart. One thing to keep in mind is that the chart, to you, will be backwards. The left side of the chart shows the right side of the patient’s mouth and vice versa. This is to emulate the place to look when looking at a patient directly.
At the bottom of the chart are the notes. In the chart notes you will find not only what happened at the last appointment but also what is needed at the patient’s next appointment.
Talking to patients
When speaking with patients, be sure to be welcoming and inviting. Make sure a patient feels welcome and avoid any form of language, body language or tones that make anyone feel they are a burden in any way. Some patients can be aggressive or insistent.
Examples:
- Yelling
- Screaming
- Swearing
- Hitting or slamming things
- Throwing things
- Being disruptive to staff and/or patients
- Not able to be redirected
- Suicidal
In the event a patient is aggressive or in a crisis, please utilize our 6911 crisis line.

Insurances
See also: Insurance and Registration
We accept all forms of insurance though the most common insurance we run into is going to be Medicaid. MNMA (Minnesota Medicaid) always covers dental and medical, though NDMA (North Dakota Medicaid) doesn’t always cover dental.
NDMA is simple enough. You will want to put in the search bar “NDMA” and select the coverage option that best fits the visit at hand. From there, put in the subscriber ID as found on the card, either beginning with 3 “0’s” or an “ND”. From here, the insurance will go through an E-Verification step and let you know if the patient is eligible for the coverage and ask again what coverage you would like to add to the account to verify, though it would only show coverage that the patient qualifies for.
For MNMA, Dental insurance is added by searching “777” and medical through “259”. For more info on MNMA, see the below sheet provided by our billing department:
Minnesota Medicaid (MNMA) Dental Insurances
This information has been copied from the document “MNMA Dental Plans”.
Minnesota Medicaid (MNMA) has a variety of different plans. As of 7/1/19, most claims will need to be filed directly with MNMA regardless of the plan the patient presents with. You will need to use the patient’s 8-digit PMI/MNMA number. The number will be listed on their insurance card regardless of the plan and will always start with a 0. Below is a list of insurances patients will have that need to be billed directly to MNMA.
If the patient has:
- BCBS BLUEPLUS OF MN/BLUE ADVANTAGE
- HEALTHPARTNERS (MEDICAID)
- UCARE CONNECT/UCARE MINNESOTA/UCARE MSHO/UCARE SENIOR CARE
- MINN MED ASSIST
- MEDICA CHOICE CARE (MEDICAID)/MEDICA DUAL SOLUTIONS
- PRIME WEST HEALTH PLAN
- SOUTH COUNTRY HEALTH
- METROPOLITAN HEALTHPLAN
- ITASCA MEDICAL CARE
Then, their dental insurance will be:
- MINN MED ASSIST DENTAL
But…
As with all things related to Medicaid, it can’t be that simple. A very small number of patients will have an MNMA plan that we would still bill to DELTA DENTAL MN (MEDICAID) or HEALTH PARTNERS (MEDICAID) DENTAL. You don’t have to worry about adding those dental plans.
If you see a patient that already has one of those dental plans added, just look under “Group name” and if you see BB, FF, or LL, you can leave it how it is. If you don’t see anything under “Group name,” simply type the last day of the previous month under “Member eff to” and add MINN MED ASSIST DENTAL with a “Member eff from” date of the first day of the current month.
You do not need to worry about trying to e-verify the MNMA dental because it will ALWAYS come back with “Plan Mismatch” or “Data Mismatch.” To avoid having Epic mess up the insurances, you can use the “Override Query” function, then enter the ID and effective date on the next screen.
Keep in mind, Insurance IS tricky to understand. If you ever have a question on an insurance or how to add/find one, just make sure you get a scan of the card and ask your co-workers in case they have come across it. If all else fails, our billing department is very good at helping find insurance as well so reaching out to them at 1204 would be a good next step when all else fails! To ensure an insurance has been added to a visit, you will want to start by going into the “visit info” tab of the patient’s chart found on the left side of the menus when checking a patient in or when in detailed view.
Sign-in vs check-in
Signing a patient in tells the providers the patient is in the clinic and filling out paperwork. Checking in a patient tells providers that the patient is ready to go.
In every case, it is ideal to start by signing in a patient when they arrive and come to check in with you at the desk. Utilize your chart prep to hand any paperwork needed over as well as collect any documents that we need on file such as insurance card and/or ID’s.
Once the paperwork has been brought back to you and you have reviewed whether it was all filled out correctly, you can then move to checking in the patient. Once in the check in menus, be sure to verify all the information in the checklist found on the right side of the screen. The goal is to make sure that all the boxes on the list are green and good to go!
Once the patient is checked in please be sure to put patient check-out sheet, stickers, and any other forms the back may need in the correct provider slot on the back wall immediately.
Phone etiquette
When answering the phones you should answer as:
- “Thank you for calling Spectra Health. This is (your name) how may I help you?
- “Spectra Health this is (your name) how may I help you?”
DO NOT answer the phone as:
- “How can I help you?”
- This is (your name)
- “Hello”
When someone internal is calling ex. (another PSR, Nursing, HR) always answer the same way you would as an external call. With the new phone system, transfers can pop up to look like it’s another employee calling.
Calling patients to schedule/reschedule, returning voicemail, confirming appointments or any other reason:
- Once the patient answers the call, you must state who you are, where you are calling from, and verify at least two pieces of information such as Last Name/ DOB.
- Example: “Hello, this is (your name) with Spectra Health. I was calling to return a voicemail I received regarding an appointment.”


Once a patient answers a call, DO NOT greet them by saying:
- “We need to reschedule your appointment.”
- “Hello, I need to confirm an appointment.”
Confirmation call script
Answered phone:
- Hello, this is (your name) calling from Spectra Health. May I ask who I am speaking with? (patient answer) Great, can you just confirm your last name and date of birth for me please. I am calling to confirm your appointment with (provider) on (date and time)
Voicemail for Adults (18+ years old):
- Hello, this is (your name) calling from Spectra Health. I was calling as a reminder for (patient first name only) he/she has an appointment for (date and time) with (provider) please give us a call back at 701-757-2100 if you have any questions or need to reschedule. Have a great day, Thank you.
Voicemail for Minors:
- Hello, this is (your name) calling from Spectra Health. I am looking for the parent or guardian of (minor first name) he/she has an appointment for (date and time) with (provider) please give us a call back at 701-757-2100 if you have any questions or need to reschedule. Have a great day, Thank you.
How to make confirmation calls
- Select on the WORK LIST at the top of Epic.
- Click CONFIRM icon.
- On the left side of the pop-up box, you will want to select SHGF Dental option
- Department list should be: SHGF Dental.
- Make sure you select Date Range Box and click RUN.
- A list of upcoming appointments should populate.
- Click on Provider/resource twice. This will help put the time of appointments in order by provider.
- If a patient confirms their appointment right click in the correct patient box and select confirm.
- If a patient does NOT answer the phone, right click in the correct patient box, click New Call under Contact info. Click Self. Under Follow-up select the correct outcome of the call made.
- When making a confirmation call, please remember to tell patients that their appointment time is 15 minutes BEFORE the scheduled appointment time. For example, if the appointment is at 3:00pm. We should tell them that their appointment is at 2:45pm.